Ethereum Dapp Tutorial — Part 3

  1. Part 0
  2. Part 1
  3. Part 2
  4. Part 3

Part 1中,我们构建了一个简单的投票dapp,并在本地机器上运行。在Part 2中,我们将应用程序移动到使用truffle框架,并将其部署到公共Ropsten testnet,并通过truffle控制台和网页进行交互。在本节中,我们将添加更多的功能到我们的投票dapp

学习内容:

  1. 使用像struct这样的新数据类型来组织和存储区块链上的数据。
  2. tokens的概念及其用法。
  3. 使用Ethereum区块链平台的货币Ether进行支付。

可以在这个仓库的chapter3目录中找到所有的代码:https://github.com/maheshmurthy/ethereum_voting_dapp

在大选中,每个公民都会为自己喜欢的候选人投一票。然而,有的选举如选举股东的公司董事会,可以根据你在该公司拥有的股份数量进行投票。所以,你拥有的股票越多,得到的选票就越多。

为了支持这种选举,我们来增强我们的投票权。我们将增加购买公司股票的功能。然后他们可以用这些股票投票给候选人。我们还将添加一个功能来查找选民信息。在以太坊区块链世界中,这些股票通常被称为代币,将这些共享作为tokens。

如果你想跳过所有的解释,只想看看合同文件,你可以在这里找到它:https://github.com/maheshmurthy/ethereum_voting_dapp/blob/master/chapter3/contracts/Voting.sol。

第一步是声明我们需要存储所有我们感兴趣的信息的变量。下面是有解释的合同变量。

1
2
3
4
5
6
7
8
9
10
11
12
13
14
15
16
17
18
19
20
21
22
23
24
25
26
27
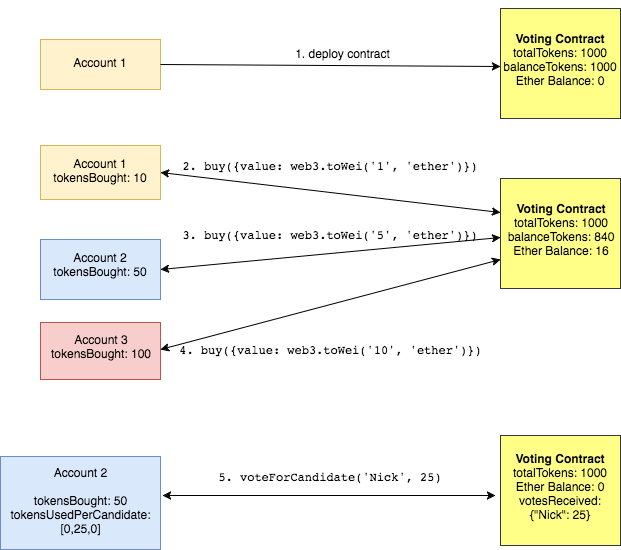
// We use the struct datatype to store the voter information.
struct voter {
address voterAddress; // The address of the voter
uint tokensBought; // The total no. of tokens this voter owns
uint[] tokensUsedPerCandidate; // Array to keep track of votes per candidate.
/* We have an array called candidateList initialized below.
Every time this voter votes with her tokens, the value at that
index is incremented. Example, if candidateList array declared
below has ["Rama", "Nick", "Jose"] and this
voter votes 10 tokens to Nick, the tokensUsedPerCandidate[1]
will be incremented by 10.
*/
}
/* mapping is equivalent to an associate array or hash.
The key of the mapping is candidate name stored as type bytes32
and value is an unsigned integer which used to store the vote
count
*/
mapping (bytes32 => uint) public votesReceived;
mapping (address => voter) public voterInfo;
/* Solidity doesn't let you return an array of strings yet. We will
use an array of bytes32 instead to store the list of candidates
*/
bytes32[] public candidateList;
uint public totalTokens; // Total no. of tokens available for this election
uint public balanceTokens; // Total no. of tokens still available for purchase
uint public tokenPrice; // Price per token

Part 1Part 2中,我们初始化了在构造函数中竞争的候选者列表。但是,在合约部署在区块链上时,构造函数只会被调用一次。在这里,我们还必须初始化可用于销售的token总数和每个token的成本。所以,我们更新我们的合约构造函数,如下所示:

1
2
3
4
5
6
7
8
9
10
/* When the contract is deployed on the blockchain, we will 
initialize the total number of tokens for sale, cost per token and
all the candidates
*/
function Voting(uint tokens, uint pricePerToken, bytes32[] candidateNames) public {
candidateList = candidateNames;
totalTokens = tokens;
balanceTokens = tokens;
tokenPrice = pricePerToken;
}

truffle中,使用migration将代码部署到区块链。可以在这里查看迁移文件。trufflemigration文件中的示例部署调用如下所示:

1
deployer.deploy(Voting, 1000, web3.toWei('0.1', 'ether'), ['Rama', 'Nick', 'Jose']);

现在我们已经初始化了token并设置了价格,让我们看看有人可以通过支付以太币来购买这些token。这是购买token的函数。

1
2
3
4
5
6
7
8
9
10
11
12
13
/* This function is used to purchase the tokens. Note the keyword 
'payable' below. By just adding that one keyword to a function,
your contract can now accept Ether from anyone who calls this
function. Accepting money can not get any easier than this!
*/
function buy() payable public returns (uint) {
uint tokensToBuy = msg.value / tokenPrice;
if (tokensToBuy > balanceTokens) throw;
voterInfo[msg.sender].voterAddress = msg.sender;
voterInfo[msg.sender].tokensBought += tokensToBuy;
balanceTokens -= tokensToBuy;
return tokensToBuy;
}

一个示例购买电话如下所示

1
truffle(development)> Voting.deployed().then(function(contract) {contract.buy({value: web3.toWei('1', 'ether'), from: web3.eth.accounts[1]})})

value: web3.toWei(‘1’, ‘ether’)参数使用msg.valuebuy()函数访问和msg.sender给我们web3.eth.accounts[1]的帐户地址。假设每个标记的值为0.1 Ether,则web3.eth.accounts[1]将接收1个Ether/0.1Ether=10tokens。

让我们休息一会儿,看看代码,并可视化账户(选民)和合同之间的交互。


index.html文件更新:

  • 为了投票给候选人,你现在必须指定否。您想要投票的标记。
  • 有一个新的部分,你可以购买令牌。
  • 现在可以查询选民信息 - 他们拥有多少令牌,不可以。他们投给了每个候选人。
  • 候选人不再被硬编码。我们从区块链中获取候选人并填充它。
  • 在app.js文件必须支持上述所有的UI功能的更新。

更新部署文件2_deploy_contracts.js以传递总共令牌和令牌价格以及候选名称。

1
2
3
4
var Voting = artifacts.require("./Voting.sol");
module.exports = function(deployer) {
deployer.deploy(Voting, 1000, web3.toWei('0.1', 'ether'), ['Rama', 'Nick', 'Jose']);
};

总而言之,在本教程中更新的四个文件是Voting.solindex.htmlapp.js2_deploy_contracts.js。一旦你用这些文件更新了truffle储存库,我们可以将合同部署到区块链。部署过程与之前的教程完全相同。

只需要使用truffle命令进行编译和migrate

1
2
3
4
5
6
7
8
9
10
11
12
13
14
15
$ truffle migrate
Using network 'development'.
Compiling Migrations.sol...
Compiling Voting.sol...
Writing artifacts to ./build/contracts
Running migration: 1_initial_migration.js
Deploying Migrations...
Migrations: 0xc9249947010675b8a3b1defb12334148f7f59010
Saving successful migration to network...
Saving artifacts...
Running migration: 2_deploy_contracts.js
Deploying Voting...
Voting: 0x795d6d1f7cf467f27e48181da5f1ebd5bbd0a8df
Saving successful migration to network...
Saving artifacts...

如果您能够成功部署合同并启动您的Web服务器,则您的页面如下所示:


将能够购买tokens,使用tokens投票给候选人并根据他们的地址查找选举人信息。如果你能够得到所有这些功能,Congratulation!

当前网速较慢或者你使用的浏览器不支持博客特定功能,请尝试刷新或换用Chrome、Firefox等现代浏览器